In this tutorial series, we will see how to create a CardView in .Net MAUI
using Border control. In .NET Maui provided Microsoft.Maui.Graphics library
which provide us a consistent UI drawing API based on native graphics engines,
thus making it easier for us to add borders, corners customisations, and
shadows for most of the controls and layout contained in .NET MAUI. The new
Border Control allows us to add Borders to a single element as a content (can
be both a control and a Layout). This brings us a very flexible behavior to
control of each corners: top-left, top-right, bottom-left, bottom-right, with
our user interface, some of those cases can be adding the border to a button
and rounding the upper left and lower right corners.
Launch Visual Studio 2022, and in the start window click Create a new
project to create a new project.
In the Create a new project window, select MAUI in the All project types
drop-down, select the .NET MAUI App template, and click the Next button:
In the configure your new project window, name your project, choose a
suitable location for it, and click the Next button:
In the Additional information window, click the Create button:
Once the project is created, we can able to see the Android, iOS, Windows
and other running options in the toolbar. Press the emulator or run button
to build and run the app
Implementation:
Open the MainPage.xaml file and add the following border control.
Border Properties
Stroke
Sets the color that the border will take on.
StrokeThickness
It’s the thickness (width) of the Border.
StrokeDashOffset
It’s the distance within the dash pattern.
StrokeDashArray
Collection of values, which is responsible for specifying the Dash
pattern and the spaces used for the border to implement.
StrokeLineCap
Defines the start and end stroke that the border will have. For the
stroke shape, it receives the following values: Flat, Round, and
Square.
StrokeMiterLimit
Limit on the ration of the miter length to half of the stroke
thickness.
We also having the StrokeShape property, which allows to modify the shape of the Stroke based on a Shape (the one you want), in addition to this Shape you can modify the edges as you need.
We also add shadow property to apply in CardView.
The final output will be like below when we come all the above properties come together.
Full Code:
Download Code:
You can download the code from
GitHub. If you have
any doubts, feel free to post a comment. If you liked this article, and it is
useful to you, do like, share the article & star the repository on
GitHub.
September 25, 2022
In this tutorial series, we will see how to manage the user subscription from the app as we are updating our Subscriptions policy ...
.Net MAUI - Manage Subscription in Android and iOS.
In this tutorial series, we will see how to manage the user subscription from
the app as we are updating our Subscriptions policy to state that users must
be able to easily cancel their subscriptions from within the app.
Project Setup:
To create .NET MAUI apps, we need the latest Visual Studio 2022 installed
with .NET Multi-platform App UI development workload with its default
optional installation options in our PC or mac machine.
Launch Visual Studio 2022, and in the start window click Create a new
project to create a new project.
In the Create a new project window, select MAUI in the All project types
drop-down, select the .NET MAUI App template, and click the Next button:
In the Configure your new project window, name your project, choose a
suitable location for it, and click the Next button:
In the Additional information window, click the Create button:
Once the project is created, we can able to see the Android, iOS, Windows
and other running options in the toolbar. Press the emulator or run button
to build and run the app
Implementation:
open the MainPage.xaml file and add the following button for subscription click
For Android, we can open the play store directly to specific app subscription if the sku and the app package name are known and the user is already subscribed. Also, we can open the subscription where all the non-exipry sucscribtions are listed.
This should also adhere to the app store guidelines.
Download Code:
You can download the code from
GitHub. If you
have any doubts, feel free to post a comment. If you liked this article, and
it is useful to you, do like, share the article & star the repository on
GitHub.
September 17, 2022
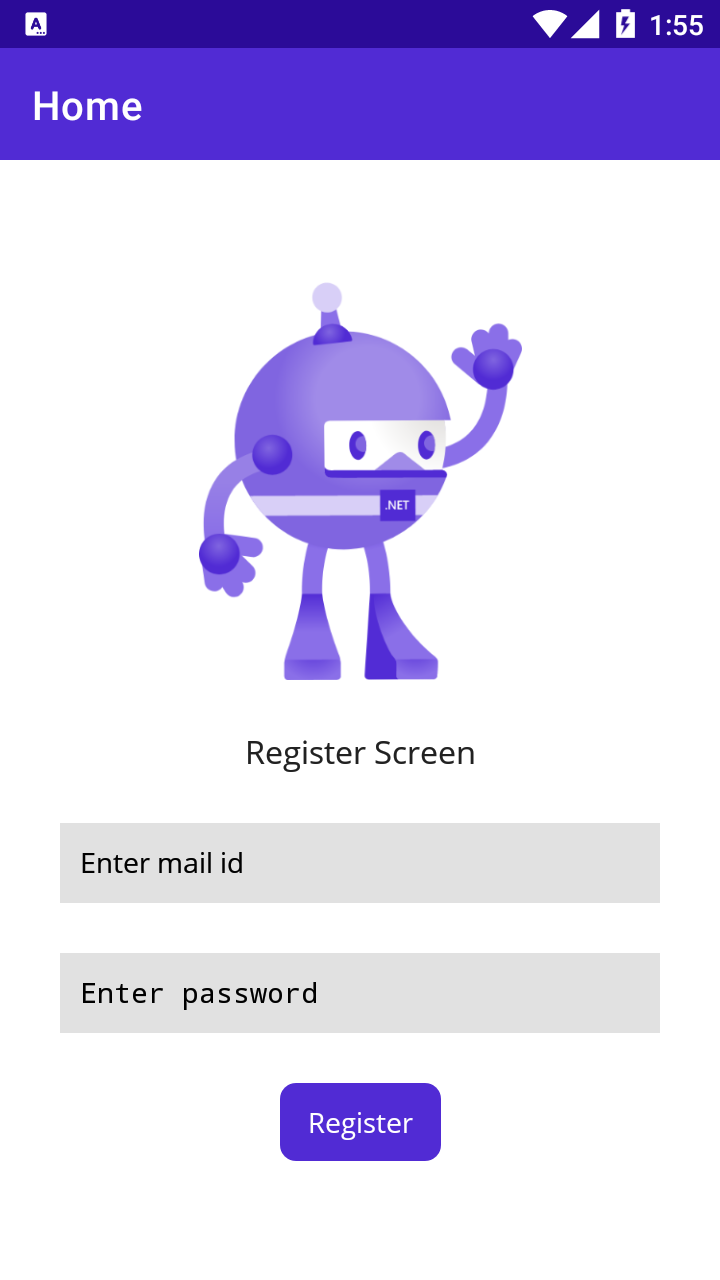
In this tutorial series, we will see the basic layout of sign-up screen using the MAUI controls in Visual Studio 2022 on Windows, ...
In this tutorial series, we will see the basic layout of sign-up screen using
the MAUI controls in Visual Studio 2022 on Windows, or Visual Studio 2022 for
Mac 17.4 Preview.
Project Setup:
To create .NET MAUI apps, we need the latest Visual Studio 2022 installed
with .NET Multi-platform App UI development workload with its default
optional installation options in our PC or mac machine.
Launch Visual Studio 2022, and in the start window click Create a new
project to create a new project.
In the Create a new project window, select MAUI in the All project types
drop-down, select the .NET MAUI App template, and click the Next button:
In the Configure your new project window, name your project, choose a
suitable location for it, and click the Next button:
In the Additional information window, click the Create button:
Once the project is created, we can able to see the Android, iOS, Windows
and other running options in the toolbar. Press the emulator or run button
to build and run the app
Implementation:
open the MainPage.xaml page designer file and add the following entries for
email and password like below
Result:
Android
Windows
Download:
You can download the code from
GitHub. If you have
any doubts, feel free to post a comment. If you liked this article, and it is
useful to you, do like, share the article & star the repository on
GitHub.
September 14, 2022
In this tutorial series, we'll learn how to create and run your first .NET Multi-platform App UI (.NET MAUI) app in Visual Studio ...
In this tutorial series, we'll learn how to create and run your first .NET
Multi-platform App UI (.NET MAUI) app in Visual Studio 2022 on Windows, or
Visual Studio 2022 for Mac 17.4 Preview.
Project Setup:
To create .NET MAUI apps, we need the latest Visual Studio 2022 installed
with .NET Multi-platform App UI development workload with its default
optional installation options in our PC or mac machine.
Launch Visual Studio 2022, and in the start window click Create a new
project to create a new project.
In the Create a new project window, select MAUI in the All project types
drop-down, select the .NET MAUI App template, and click the Next button:
In the Configure your new project window, name your project, choose a
suitable location for it, and click the Next button:
In the Additional information window, click the Create button:
Once the project is created, we can able to see the Android, iOS, Windows
and other running options in the toolbar. Press the emulator or run button
to build and run the app
Visual Studio will build the app, and deploy the app to the emulator or
device.
The sample app screen will be look like the below in Android, iOS and
Windows.
Android Output:
iOS Output:
Windows Output:
August 28, 2022
Introduction Xamarin.Essentials Xamarin.Essentials provides developers with cross-platform APIs for their mobile applications. Andro...
Xamarin.Forms - Text To Speech Using Xamarin Essentials
Xamarin.Essentials provides developers with cross-platform APIs for their
mobile applications. Android, iOS, and UWP offer unique operating system and
platform APIs that developers have access to all in C# leveraging Xamarin.
Xamarin.Essentials provides a single cross-platform API that works with any
Xamarin.Forms, Android, iOS, or UWP application that can be accessed from
shared code no matter how the user interface is created.
Text-to-Speech
This enables an application to utilize the built-in text-to-speech engines to
speak back text from the device and also to query available languages that the
engine can support.
Coding Part
Steps
1: Creating new Xamarin.Forms Projects
2: Implementation of Text to Speech in Xamarin Forms
Step 1: Creating new Xamarin.Forms Projects
Create New Project by selecting "New Project" à "Xamarin Cross Platform App"
and Clicking "OK". Note: Xamarin.Forms version should be greater than
5.0.
Then Select Android and iOS Platforms as shown below with Code Sharing
Strategy as PCL or .Net Standard and Click OK.
Step 2: Implementation of Text to Speech in Xamarin Forms
In this step, we will see how to implement the functionality in Xamarin.Forms.
Platform Specific Changes:
If your project's Target Android version is set to Android 11 (R API 30) you
must update your Android Manifest with queries that are used with the new
package visibility requirements.
Open the AndroidManifest.xml file under the Properties folder and add the
following inside of the manifest node:
Xamarin Forms App Changes:
Add a reference to Xamarin.Essentials in your class:
Text-to-Speech works by calling the SpeakAsync method with text and optional parameters, and returns after the utterance has finished.
This API provide more options on how the audio is spoken back with SpeechOptions that allows setting the volume, pitch, and locale.
Full Code
Result
Download Code:
You can download the code from
GitHub. If
you have any doubts, feel free to post a comment. If you liked this article,
and it is useful to you, do like, share the article & star the repository
on GitHub.
August 28, 2022
This is a short article to announce the new features included in the SCRCPY GUI app. As a fan of SCRCPY, we are working on the new...
This is a short article to announce the new features included in the SCRCPY
GUI app. As a fan of SCRCPY, we are working on the new features including in
it's companion app SCRCPY GUI and further more features will be added based on
the ADB shell commands.
SCRCPY GUI New Features
Install Apk from PC to Android Phone
One Click option to take screenshot from PC
I have publihsed this app in GitHub as open source and requesting your contributions. I will be update this repository for new features.
August 08, 2022
Introduction In this tutorial, we will learn how to create and use app shortcuts in the xamarin forms app using Xamar...
In this tutorial, we will learn how to create and use app shortcuts in the xamarin forms app using Xamarin Essentials - AppActions class lets you create and respond to app shortcuts from the app icon. This will allow to navigate to the corresponding page from the app icon.
Coding Part
Steps
Step 1: Creating new Xamarin.Forms Projects
Step 2: Setting up the App Actions in Android and iOS
Step 3: Implementation of App Shortcuts in Xamarin Forms
Step 1: Creating new Xamarin.Forms Projects
Create New Project by selecting "New Project" à "Xamarin Cross Platform App"
and Clicking "OK".
Note: Xamarin.Forms version should be greater than 5.0.
Then Select Android and iOS Platforms as shown below with Code Sharing
Strategy as PCL or .Net Standard and Click OK.
Step 2: Setting up the App Actions in Android and iOS
In this step, we will see how to setup the code for Android and iOS.
Android Setup
Add Intentfilter for App Action in your MainActivity.cs class. Refer to the below image.
Then add the following logic to handle actions:
iOS Setup
In the AppDelegate.cs add the following logic to handle actions:
Step 3: Implementation of App Shortcuts in Xamarin Forms
In this step, we will see how to implement the functionality in Xamarin.Forms.
Create App Actions in Xamarin.Forms
App Actions can be created at any time, but are often created when an application starts. Call the SetAsync method to create the list of actions for your app.
If App Actions are not supported on the specific version of the operating system a FeatureNotSupportedException will be thrown. The following properties can be set on an AppAction:
Id: A unique identifier used to respond to the action tap.
Title: The visible title to display.
Subtitle: If supported a sub-title to display under the title.
Icon: Must match icons in the corresponding resources directory on each platform.
When your application starts register for the OnAppAction event. When an app action is selected the event will be sent with information as to which action was selected.
You can download the code from
GitHub. If you
have any doubts, feel free to post a comment. If you liked this article, and
it is useful to you, do like, share the article & star the repository on
GitHub.
August 02, 2022
Introduction In this tutorial, we will learn how to play a video or audio file in Xamarin.Forms applicati...
In this tutorial, we will learn how to play a video or audio file in
Xamarin.Forms application. This feature is not available by default in
Xamarin Forms. So, we need to add an additional plugin to achieve these
features. "MediaManager Plugin" offers this functionality."MediaManager Plugin" offers this functionality.
Media Manager
Designed to be simple and easy to use
Native playback of media files from remote http(s), embedded and local
sources
Native media notifications and remote controls
Queue and playback management by default
Playback status (Playing, Buffering, Loading, Paused, Progress)
Events for media handling to hook into
Coding Part
Steps
Step 1: Creating new Xamarin.Forms Projects
Step 2: Setting up the Media Manager in Xamarin.Forms .Net Standard
Project
Step 3: Implementation of Xamarin Forms - Video Player App
Step 1: Creating new Xamarin.Forms Projects
Create New Project by selecting "New Project" à "Xamarin Cross Platform App"
and Clicking "OK".
Note: Xamarin.Forms version should be greater than 5.0.
Then Select Android and iOS Platforms as shown below with Code Sharing
Strategy as PCL or .Net Standard and Click OK.
Step 2: Setting up the Media Manager in Xamarin.Forms .Net Standard
Project
In this step, we will see how to setup the plugin.
Open the Nuget Manager in the Visual Studio Solution by right click the solution and selecting “Manage Nuget Packages”.
Then select below mentioned 2 plugins and check all the projects in the
solution, install the plugin.
Plugin.MediaManager
Plugin.MediaManager.Forms
Step 3: Implementation of Xamarin Forms - Video Player App
In this step, add a VideoView control to your project. For that, go to
Solution Explorer >> double click on MainPage.Xaml. After opening this, you
can add VideoView assembly and XAML code to your project.
Include the video view control in your xaml file and add the button to
perform play/pause operations.
We are going to play the video from the url as like in the below snippet.
Then add click event to perform the play and pause operations. We need to
use the below mentioned code part to peform the play/pause operations
using Media Manager
The final code behind will look like below.
Make sure to call " CrossMediaManager.Init(this, savedInstanceState); "
for Android or " CrossMediaManager.Init(this); " for iOS from your
platform code before starting playback, otherwise the video View will not
be prepared to display the video.
Result
Download Code:
You can download the code from
GitHub. If you
have any doubts, feel free to post a comment. If you liked this article, and
it is useful to you, do like, share the article & star the repository on
GitHub.
June 26, 2022
SCRCPY and its feature SCRCPY pronounced "SCReen CoPY". This application provides display and control of Android devices co...
How to mirror and control the Android Phone from PC using SCRCPY and SCRCPY-GUI
SCRCPY pronounced "SCReen CoPY". This application provides display and control
of Android devices connected via USB or over TCP/IP. It does not require any
root access. It works on GNU/Linux, Windows and macOS. I am a biggest fan of this
tool even multiple tools (Vysor) are available in the market.
It focuses on:
lightness: native, displays only the device screen
performance: 30~120fps, depending on the device
quality: 1920×1080 or above
low latency: 35~70ms
low startup time: ~1 second to display the first image
non-intrusiveness: nothing is left installed on the Android device
user benefits: no account, no ads, no internet required
I am big fan for SCRCPY. Thus I have built a small WinForms Application names
as SCRCPY GUI to ease the device selection and screen mirroring using the
SCRCPY, install the apk from the PC. Please find my tool details and the steps to using the tool.


Follow Us
Were this world an endless plain, and by sailing eastward we could for ever reach new distances